
The Admin User Account
The admin user in Convergence exists to perform special setup tasks, and to act as a "super user" that can access any case data, can change data fields, delete files, and other tasks that normal Convergence users would not do.
The admin user account is reached by logging in with user name 'admin' and the admin password that was set during installation, or reset by the admin user. The admin account is always present and may never be deleted. No additional admin accounts may be created.
Adding the First New User
Once you have installed Convergence, you should log in as the admin user and perform some basic setup tasks. The first thing that should happen is to add a new user account that you will use as your day to day log in. It is best to keep the admin account separate from your personal account. When you log in for the first time, you will see a list containing one sample case entry. You will want to go to the users section of the popup menu and click 'New User'. This will take you to a form for creating a new user account.
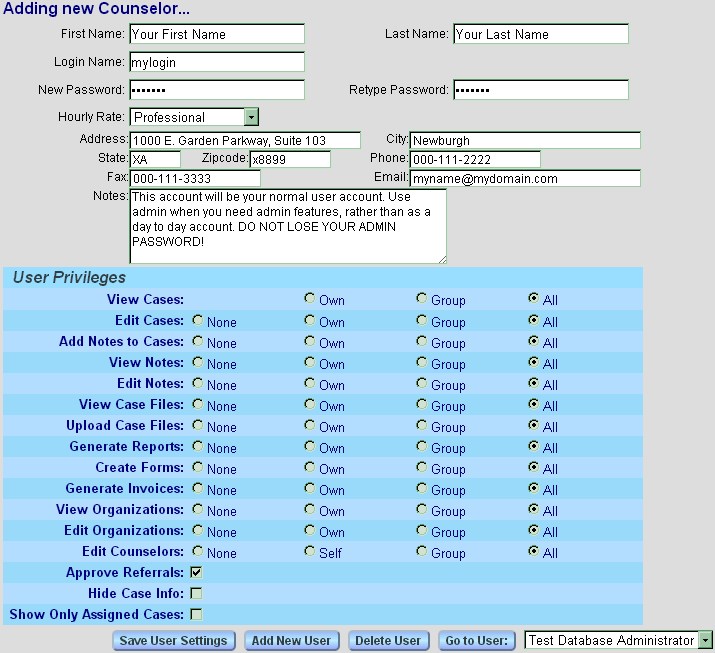
In the example shown, users are named 'Counselors', and you would click 'New Counselor' to start a new account. The names for users, cases, etc. are set in Preferences. Your first new account should have the full privileges that a non-admin user can have, as shown above. See User Management for more details about how this form works.
Privileges of the Admin User
The admin user always has all settable privileges plus access to special admin only features of Convergence. The admin user also has access to special templates that are part of the Convergence interface. Interface templates may not be accessed by any other Convergence users.
The Administration Menu
If you are logged in as the admin user, there will be an extra section in the popup menu and navigation page labeled 'Administration'.
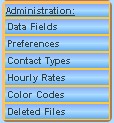
This menu gives you access to features only admin can reach. These are settings that change data fields, appearance of the Convergence interface, names of things, the kinds of parties there are to cases, and whether they are called cases or parties at all. The hourly rate menu is controlled by the admin user, and admin may permanently delete uploaded files to save space. Some of these functions could wreak havoc with your database if non-admin users were able to access them.
The menu choice 'Data Fields' will take you to the data fields configuration screen where you can define your own custom data fields for cases, case notes, invoices, users, or contacts.
Clicking 'Preferences' will take you to the preferences and settings page where you many set up your Convergence nomenclature (What cases, clients, etc are called), your company name and address, default hourly rate, user roles, and some billing settings.
Clicking 'Contact Types' will take you to a page for managing the types of contacts for, or parties to a case you might want to have in your database. These contact types will be what fills in the contacts section of your menu and navigation, and each contact or organization type can be assigned special custom data fields.
The 'Hourly Rates' menu item opens the screen for managing your hourly rate menu. This menu appears in user management, case inventory, and case note pages. There are settings so that certain users or activities will have a special hourly rate set when a new case note is originated.
Clicking 'Color Codes' takes you to the color code management page where you may set up color codes for case, case note, contact, or invoice lists. This allows you to set up color codes for conditions such as an invoice of above a certain value, or a particular type of case, or if certain words appear in comments, or many other things.
The 'Deleted Files' menu item opens the deleted file page, the "file trash" area of Convergence. While deleted files can be set to totally remove automatically after a certain number of days, this page allows the admin user to remove files early, or to restore wrongly deleted files.
Admin Navigation Menu
When the current page is an admin only function, the admin navigation menu appears at the top of the page. With this menu you can move quickly from one admin function to another. This menu will only be seen by the admin user.

Some of the menu choices are like the Administration menu above, linking to Preferences, Contact Types, Hourly Rates, Color Codes, and Deleted Files. There is also a choice for each possible custom data field setting. This includes all the places where custom data entry fields can be added, such as case, case note, invoice, or case contact. Each contact type is use has a choice to go to its custom data field settings.
The '?' help button is right of the admin navigation menu, and will open a new window or tab with the Convergence manual page for the function you are currently using.

When the admin user is in an admin only page, changes must be saved by either choosing another admin page from the navigation menu, clicking 'Save' on the admin header, or by clicking 'Save Settings' at the bottom of the page. The buttons 'Exit' or 'Exit Admin' will leave the admin page without saving changes to settings, functioning like the Cancel button elsewhere.
Setting Preferences
The Convergence preferences page is reached by clicking 'Preferences' in the administration section of the menu. This page contains a number of basic admin only settings for Convergence, including your nomenclature, company information, hourly billing preferences, user roles, and automatic removal of files marked deleted. The button 'Save Settings' must be clicked for any changes to take effect.

The top section of the form is your company information. This is used by Convergence to fill in return addresses and headings, and this information may be inserted in document templates. The standard invoice template contains a header that displays information from this part of the form.
There are three checkboxes that control when the Task and Appointment Reminder Popup appears. The feature can be turned off by unchecking the first checkbox 'Enable Task Reminder'. If it is enabled, it can be limited to appearing only right after logging in, or only if there are current appointments or tasks. Otherwise it will show on each Convergence page to the right of the top menu.
The next section contains some miscellaneous settings related to billing and time display:
The 'Time Format:' selector controls the default time format used by case notes and invoices.
The setting 'Minimum Billing Time: __ Minutes' can be used if all case notes should have a minimum time regardless of how much time was recorded by the timer.
The setting 'Round billing times to nearest __ Minutes' controls what fraction of an hour you wish to round billable time to. For example, if you set it to 30, all case note times will be rounded to the nearest half hour.
The Time Zone selector will fill in with a standard time zone name. This setting is especially important if your hosting service is not in the same time zone as you. Suggestions will pop up as you type in the field. The default time zone if none is filled in, or the entry cannot be assigned to a standard name, is 'America/Los_Angeles'. Some settings are aliased, so in the example below, de aliases for 'De Noronha'. Typing Seattle into the field will suggest 'America/Los_Angeles', in the same time zone. If no standard suggested name is clicked on, the top choice is automatically saved as the time zone when clicking 'Save Settings'.

The checkbox 'Auto Start clock in Note form' determines whether the clock starts ticking immediately when a case note is started or opened, or whether it will wait until a user clicks a start button.
The checkbox 'Show Notes in calendar' determines whether case notes are among the events graphed and tabulated in daily, monthly, and yearly calendar views.
The checkbox 'Combine Notes of same date and activity for invoicing' may be used to condense invoice line items when the same case activity is billed several times in a day. This saves needing to manually combine notes on invoices if this is a regualar billing practice. See Combining Invoice Items for information about combining notes on invoice line items.
There is also an option to automatically remove deleted files after a certain number of days. If that field is left as zero or blank, files will not be automatically removed, and it will be up to the admin user to manually delete them in the Deleted Files admin page.
The next section, 'Name Configuration' sets up the names you will use for cases, clients, case notes, users, and referral forms. These names will be used throughout Convergence and will appear in navigation menus. It is important to set this up to your preferred names soon after installing Convergence. Whether your organization has care providers logging in to deal with patients, or salespeople logging in to deal with accounts and customers, or if therapists deal with cases and clients, this is where you set these names for your Convergence database. The exact data entry fields for each of these are set up in the Data Fields admin page. If you leave the plural name fields blank, Convergence will fill in the best guess for the plural version of the name, but the fields are there in case any term you use does not pluralize normally.
The user roles section is documented in the User Management page of this manual.
The next section is for the HTML editor that Convergence can use to enhance editing templates and generated documents. CKEditor is a freeware HTML editor that is bundled with Convergence. It is not part of our product, and if you choose not to use it, you may uncheck 'Use CKEdit for enhanced text editing' and you will get a plain text area displaying HTML when you edit a template or document. Plain text editing is also an option if you do check this box, and edit in source mode. If you wish, you may change the backdrop color for CKEditor by entering a color with the color picker next to 'Editor Color:'.
The last section is the settings you will need if you intend to have Convergence send email, such as emailing files. These settings can be obtained from your hosting company, usually available on a help page or in an email sent to you. You can use your hosting CPanel control panel to create a new email account and password if you need to. SMTP is the commonly used email server protocol used to send emails.
This manual is published by Convergence Case Management Data Retrieval Software, LLC, whose software products are provided for use by parties who have paid for and have a current license to operate the software described herein.
Information in this manual is subject to change without notice, and does not represent any commitment on the part of Convergence Case Management Data Retrieval Software, LLC. The software described in this manual is furnished under a license agreement and may be used only in accordance with its terms and conditions.
© Copyright 2026 Convergence Case Management Data Retrieval Software, LLC
This manual contains propietary information which is protected by Copyright. No part of this document may be reproduced, translated into any language or computer language, or transmitted in any form whatsoever without the prior written consent of Convergence Case Management Data Retrieval Software, LLC.